Disclaimer: These instructions are intended as a guide. Cabriolet Hydraulics is not liable for damages or injury. Use at your own discretion. If after reading through these instructions, you are unsure about your ability to perform this repair, seek experienced help. There is no substitute for common sense and experience.
Hydraulic Cylinder Inspection


- Begin from the top-up/locked position and activate the top-down operation just enough to unlock the front top latch and retract the rear deck as shown in Fig.1. Remove the key so that the top cannot be accidentally activated during the procedure.
- Reaching under the retracted deck, remove the rear top anchoring cable ends by prying the connectors away with a suitable prying tool. If you are strong enough, the connectors can be removed by hand. There are two of them, one on each side. Right side shown in Fig. 2.
- Fold the rear of the top forward by lifting up the back edge and pushing forward. The top should stay in this position on its own, as shown in Fig. 5 of the Hydraulic Cylinder Removal instructions. Note: for 2002 and later cars with rear glass window, the back edge of the top will need to be propped up.

Fig. 3 shows a close-up of the right side cylinder. Inspect the area shown by the arrow. Look for hydraulic fluid and grime on the cylinder housing, end bushing and shaft. The grime is generated by airborne debris being attached to the leaked hydraulic fluid. The forward end of the cylinder can be inspected by reaching in with your hand and touching the area with your fingertips. Grime and moisture pickup on your fingertips are signs of hydraulic fluid leakage caused by cylinder seal failure. Inspect the left side cylinder in the same manner.
Hydraulic Cylinder Removal
Notes:
- Always handle the cylinders with care. The cylinder shafts are made from a soft steel and damage easily. Deep dings cannot be removed and will cause leaks.
- Hydraulic lines are not removable from the cylinders.
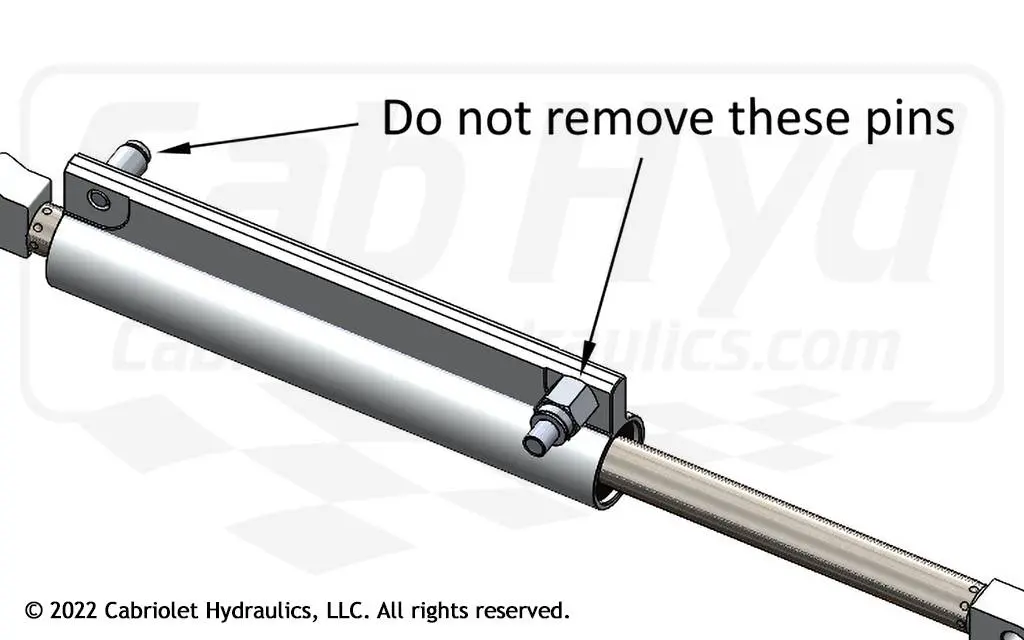
- Do not unscrew the guide and drive pins from your cylinders. The rebuilt replacements will have the pins already installed.
- Do not over-flex the cylinder hydraulic lines, as they may be weakened and subsequently cause leakage.
- Keep the open hydraulic line connectors and seals clean to prevent hydraulic fluid leaks after assembly.
- Hydraulic fluid can irritate your skin. Use latex or nitrile rubber disposable gloves.
- Keep the work area and tools clean.
- Cover the local area of the car to protect the paint.
Required Tools:
- Prying tool
- 10mm combination or gear wrench
- 13mm combination or gear wrench
- Flat blade screwdriver
- 12mm socket and ratchet
- Small parts tray


- Begin with steps 1 through 3 of the Hydraulic Cylinder Inspection instructions. Using a suitable prying tool, remove the plastic fasteners that secure the rear molded carpeting and remove the carpeting. Fig. 4 shows some of the fastener locations. At this point, your progress should look like that of Fig. 5.
Note for 1999–2001 cars: The rear lid actuator should be moved out of the way to access the hydraulic connectors. Flushing aged hydraulic fluid from the pump requires pump removal, in which case the actuator must be moved. For 2002 and newer Carrera, skip steps 5 through 12 and proceed to step 13.


- Remove the rear deck actuator black connector from the control module by squeezing the side tabs and pulling the connector downward. See Fig. 6.
- Remove the white electrical connector by squeezing the side tabs and pulling upward. See Fig. 6.
- Remove the other side of the white connector from the blue connector by pushing the white center tab toward the rear and pushing the connector downward, as show in Fig. 7.
- Remove the black plastic cone from the rear lid actuator by pulling it forward. See Fig. 6.
- Unscrew the two 10mm nuts that attach the actuator to the bracket. You can use a combination wrench or gear wrench.


- If the hydraulic lines are tied to the lid actuator flex shafts, remove the ties from both sides of the car. See Fig. 8 and Fig. 9.
- Release the lid actuator flex shafts by prying off the cylindrical portion of the black plastic strap from the stud on both sides of the car. See Fig. 8 and Fig. 9.

- Remove the actuator by pulling backward against the molded rubber insulator covering the cowling. This may require a little effort as the space is tight. Pull upward and place the actuator on the cowling and tie it back to prevent it from sliding forward into the work space. Two elastic cords were used here to accomplish this. See Fig. 10.


- Remove the clips from the cylinder drive pin and frame pin as shown in Fig. 11 and 12 and remove the left and right drive arm. Pry the tab on the clip until it clears the end of the pin, and slide the clip off by pushing in the direction show by the arrow. Be careful not to drop the clip, as it may be difficult to retrieve. Slide the drive arm off the pins as show by the arrow. If there is some resistance, grab the side of the top and pull it backwards slightly. This will relieve the side force on the pins.

- Gently pull up on the hydraulic lines to remove them from the hold-down clips. Do not bend the lines excessively, as this may cause damage to the lines. The left side is shown in Fig. 13. The right side is similar.


- Place several layers of shop towels under the pump and unscrew the two banjo bolts using a 12mm socket. Some hydraulic fluid will drain out and absorb into the shop towels. Note the position of the copper seals and the blue and red banjo connectors, Fig. 14. Place the bolts and washers in a clean parts tray. Fig. 15 shows the loose banjo connectors. At this point, wrap the banjo connector ends with shop towels or cover with plastic baggies to keep them clean and to prevent hydraulic fluid leakage during cylinder removal.


- To remove the cylinders, unscrew the two cylinder shaft nuts with a 13mm box wrench or gear wrench, as shown in Fig. 16. A gear wrench works well here. Be patient when removing these nuts as they can be easily dropped and lost in the wheel well cavity. The forward nut is removed by simply reaching in and unscrewing it. Remove the cylinders from the car. Caution: Be careful not to ding the shafts when working around or handling the cylinders.
Note-left side cylinder only: A potentiometer lever is linked to the cylinder guide pin. Fig. 17 shows the potentiometer arm with the cylinder removed.
Preparing Cylinders For Shipping
Note: Do not unscrew the guide and drive pins from your cylinders. The rebuilt replacements will have the pins already installed.

- Place the hydraulic line ends into a clean bucket as shown in Fig. 18. While holding the cylinder housing firmly in one hand, push and pull the shaft from end to end several times with the other hand. This action will pump most of the fluid from the cylinder.

- Push the cylinder shaft completely to one end. Wrap the exposed cylinder shaft with bubble wrap, foam or anything else that will protect it from getting damaged as shown in Fig. 19. Cover the line ends with baggies and snug up with twist ties, zip ties or tape. Wrap each cylinder individually before placing them both in the shipping box. Pack plenty of space filler to keep the cylinders from shifting around.
Shipping Instructions
- Make sure to pack and ship your parts in a sturdy, well-padded box.
- Fill out our Customer Information Sheet and put it inside the box with your parts.
- We recommend adding additional shipping insurance to cover for loss or damage.
- Make sure that you get a tracking number for your shipment, so you know when we receive your package.
- You won’t hear from us when we receive your package unless there is a problem. If there is damage or if any parts are missing, we’ll call you before we start the rebuild to let you know what we’re seeing and discuss any additional repair costs. Otherwise, the first that you’ll hear from us is when the rebuild is complete, and we call to collect credit card payment.
Important Notice: Until further notice we are currently not shipping orders international or accepting international shipments to us.
Ship Cylinders To:
Cabriolet Hydraulics
2111 72nd Terrace E
Sarasota, FL 34243