Hydraulic Hose Repair Couplers
If you need to repair a damaged section of hydraulic hose for your convertible top without replacing the entire line, our Hydraulic Hose Repair Couplers could be the perfect solution. Cabriolet Hydraulics’ patented Hose Couplers* are specifically designed to repair or reconnect common hydraulic hoses used in modern convertible top systems. In many cases, leaking hydraulic hoses can be quickly and permanently repaired on the vehicle using basic hand tools.
Our couplers replicate the factory crimping process internally and externally, ensuring a secure and reliable connection. Most convertible hydraulic systems with small bore (internal) diameter lines operate at peak pressures of up to 200 bar (2,900 psi). Cabriolet Hydraulics’ Hose Couplers* are pressure-tested to withstand up to 10,000 psi, offering unmatched durability and peace of mind.
These repair couplers are compatible with many factory (OEM) hydraulic hoses used in modern convertibles, vario-roofs, and retractable hardtops from leading brands, including Audi, Bentley, BMW, Cadillac, Chevrolet, Chrysler, Ferrari, Ford, Infiniti, Jaguar, Lamborghini, Maserati, Mercedes-Benz, Mitsubishi, Nissan, Pontiac, Rolls-Royce, Saab, Volkswagen, Volvo, and more. For compatibility, refer to the Hose Coupler Installation Requirements to confirm whether our repair couplers will work for your specific application. Important Note: The Hose Couplers* are NOT reusable.
If a Hose Coupler* isn’t suitable for your repair, we also offer high-pressure replacement hoses tailored to your needs. Visit our Convertible Top Hydraulic Hoses page for more information.
Important aftermarket cylinder information
If you intend to use Cabriolet Hydraulics hose repair couplers to reconnect the front latch cylinder, do not cut the hoses until you confirm that the hose diameter is 4.5mm (.177”).
These hydraulic cylinders have shown up on the market recently; they are not Original Equipment Manufacturer (OEM). These aftermarket cylinders can be identified by the characteristics shown in the image on the right. Due to their larger hose diameter, our hose couplers will not fit these non-OEM cylinders.

Important blistered hose information
Please note that our Hose Coupler is designed to repair an externally damaged (cut or pinched) hose. If your hose has one or more blisters or bubbles on it, there is an internal problem that the Hose Coupler will not fix. Please see the diagram on the right for an explanation. A blistered/bubbled hose can only be fixed by replacing the entire hose; see our replacement hose page for more information.
When the leak originates from the inside layer, fluid travels between the inner and outer layers of the hose and will blister the outer layer anywhere along the hose in the weakest spot. The Hose Coupler seals the inner layer of the hose only -- it does not seal in between the inner and outer layers.

Couplers will not fit hoses for the following convertibles:
1998-2003 Saab 9-3 Cabriolet
1997-2006 Jaguar XK8/XKR
1996-2003 Bentley Azure
1997-2004 Aston Martin DB-7 Volante
2000-2002 Rolls Royce Corniche
1994-2002 VW Golf Cabrio
1995-1999 Ferrari 355 Spider
1999-2006 Audi TT Roadster


-
Cabriolet Hydraulics Hose Couplers* fit only factory-installed hoses with 1.8mm and 2.0mm internal (bore) diameters and 4.5mm outer diameters. Check printing on your damaged OEM hose to identify the actual hose bore diameter. Hose Couplers* will fit hoses with the following printed designations: AF1.8, DN1.8 for 1.8mm and AF2.0, DN2.0 for 2mm bores. The hoses must have a 4.5mm outer diameter. Actual outer diameters can vary between 4.45mm and 4.55mm. See Pic1 for examples of printed sizes on the most common factory-installed hoses. Measure the outer hose diameter with a precision vernier caliper.
-
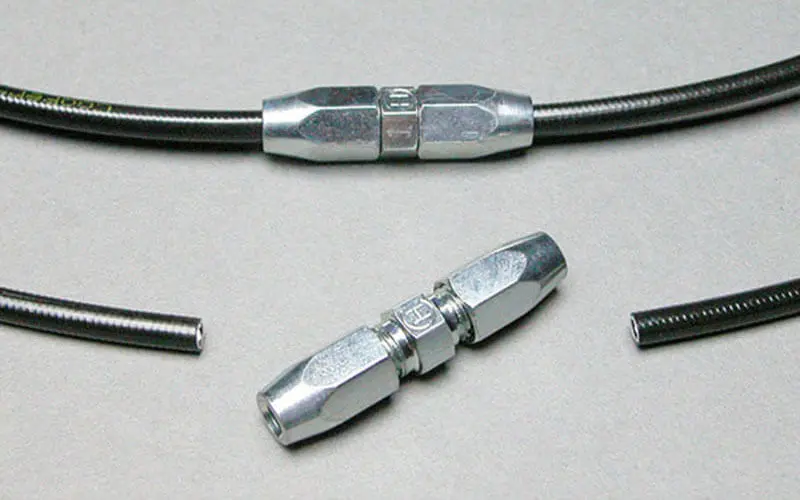
The Hose Coupler can be used to reattach a hose with a minimum length of .750″ (19mm) from the metal connector, see Pic2. The hose should not be cut too close to the fitting unless it is necessary for the repair.
-
The Hose Coupler must not interfere with the top mechanism. The repaired hose must have an adequate bend radius so that it does not fold and collapse on itself during operation. See Pic2 for coupler dimensions.
-
Space must be provided for handling the installation tools.
-
The Hose Coupler is designed for a one-time use. The hose coupler cannot be reused.
Hose Coupler Installation Instructions
Important Note: Hose Couplers are one time use only. They cannot be reused.
Disclaimer: These instructions are intended as a guide. A similar procedure can be performed in actual on-the-car hydraulic hose repairs. Read the entire instructions and make sure that you understand them before you begin the repair. Before you begin your particular repair, have a clear plan from start to finish. Common sense and experience must be applied. If after reading these instructions you are unsure about your ability, seek experienced help. Cabriolet Hydraulics is not liable for damages or injury.

Suggested installation tools: A block of wood, utility knife with sharp blade, narrow nosed pliers, narrow nosed locking pliers, two 10mm open-ended wrenches, small adjustable wrench. See Pic3.

Step 1: Before beginning repair, make sure that ignition is OFF and the hydraulic system is depressurized.
Step 2: With a sharp utility knife, make perpendicular cuts to remove the damaged section of hose. This will ensure square, clean-cut hose ends. Whenever possible, use a block of wood to support the hose. The knife should slice through the hose easily, see Pic4. Do not use wire/diagonal/side cutters, saws or cut-off wheels. Such tools distort the cut ends of the hose and produce loose particles that can enter the hose and cause hydraulic system failure.

Step 3: Make sure that both crimping nuts are situated loosely on the coupler. Hold the coupler firmly with one hand and with the other hand insert the hose forcefully with a twisting motion into the coupler, see Pic5.

Step 4: Unscrew the crimping nut and slide away from the Hose Coupler as shown in Pic6.

Step 5: Hold the Hose Coupler firmly with hand or clamp with locking pliers around the center hex of the Hose Coupler body, see Pic7.


Step 6: Fold the supplied patch of sandpaper with abrasive side over the hose and clamp slightly with narrow nose pliers, see Pic8. This will provide grip while protecting the hose from the pliers. Using the narrow nose pliers, push the hose into the Hose Coupler while twisting back and forth, until the hose is seated against the shoulder. A gap of .040″ (1mm) or less is acceptable, however contact with the shoulder is preferred, see Pic9. If necessary, use a flashlight and magnifier to verify the position.
Important notes: The pliers and sandpaper patch are intended to aid in inserting most 1.8mm internal diameter hoses into the Hose Coupler. These smaller hoses fit tighter in the Repair Coupler.
Once installed, the tighter fitting hoses may be too difficult to remove from the Hose Coupler without damaging the hose end. If the hose is removed, inspect the end very carefully and trim off any damage. Do not attempt to cut and split the hose length-wise inside the Hose Coupler. Doing so will damage the barbed center and cause a leak. Any tampering or damage to the Hose Coupler will void the warranty.
For some 1.8mm and most 2.0mm internal diameter hoses, use of the pliers and sandpaper patch may not be necessary to insert the hose into the Hose Coupler. The looser fit will allow the hose to be inserted by hand.

Step 7: To prevent cross threading, thread the crimping nut onto the Hose Coupler by hand until resistance is felt. The nut should be 1/8″ away from the center hex of the Hose Coupler, see Pic10.

Step 8: Support the center hex with a 10mm open-ended wrench or narrow nose locking pliers and with another 10mm open-ended wrench or adjustable wrench, and turn the crimping nut until it bottoms against the center hex. Rotation will become more difficult as the nut begins to bottom. A definite stop will be felt when the clamping nut bottoms, see Pic11. Do not overtighten the nut. Also, make sure that looser fitting hoses stay in the correct inserted position while you are tightening the crimping nut.
Step 9: At this point, finalize your hose routing before the other hose end is inserted into the Hose Coupler. Once the hose is inserted and crimped into the Hose Coupler, it cannot be removed. Repeat steps 4-9 for the other hose end.
Hose Coupler Warranty
Our Hose Couplers* are designed for automotive hydraulic convertible top hose repairs having specific requirements. See Hose Coupler Installation Requirements. When properly installed, our Hose Couplers are warrantied for 5-years. These are high quality parts made in the USA. To receive a warranty replacement, the Hose Coupler in question must be sent back to us along with the attached hoses on both ends for inspection. The returned Hose Coupler will be inspected to make sure that it was properly installed. Any damage due to tampering, mishandling, or improper installation of the Hose Coupler will void the warranty.
*Hose Coupler US Patent 9,482,375